Friday, May 30, 2014

HEALTHY TWIST ON AN OLD SALAD & YUMMY SWEET KIWI BITES

Welcome to Healthy Foodie Friday!

I was thinking about what recipes to share today because I really wanted to keep with my theme of "healthy" summer salads. I think we should enjoy the fresh summer produce while it is in season. 

Today at my house we are having a quiet celebration. My husband is a guy that doesn't require a lot of attention.....fanfare is not his thing. But he has always told our daughters that we need to celebrate the "wins!" So today I made a special dinner for him.....celebrating his win. And what a wonderful "win" it is!

When I started planning dinner I started with a nice steak. We rarely have red meat so this would be the ultimate treat for him. Then I searched for a new salad recipe. I found a Cauliflower "Potato" Salad recipe that sounded kind of strange, but as I read the ingredients listed, they actually were quite an interesting combination. A cauliflower salad that looked like a potato salad? Hmmm........he loves cauliflower, but would he like it in a salad, with dill pickles?


He sure did like it! As you can see it looks like a potato salad. It was great with our steak. Although, he thought it was mayo on the salad when he tasted it, the actual ingredient is a much healthier sour cream base. Surprise!

There are 165.7 calories per serving, making this salad a great healthy choice and a wonderful side for those summer meals.

The original recipe may be found at:http://healthyrecipesblogs.com/2013/10/22/cauliflower-potato-salad/

 So---everyone needs a little something sweet when they celebrate. He's not a big cake guy (unless it's carrot cake), so I decided to try these KIWI BITES. It has always intrigued me to use chocolate and fruit together....how delicious!


Ingredients needed:

  • Bar of 72% Cacao Dark Chocolate 
  • Popsicle stick
  • Kiwi slices
1. Melt the chocolate in a microwave safe bowl. Timing it based on how much chocolate you require for your slices.
2. Slice the kiwi in a rather thick slices. (see above)
3. Thread the kiwi on to the popsicle stick.
4. Dip in melted chocolate.
**I propped my sticks so that they leaned against the side of a small jar. You can use anything, they just need to be stored upright and placed in the frig to chill once dipped.

KIDS would LOVE these too! 

Hope you enjoyed this segment on Summer Salads and Sweet Treats keeping an eye towards the healthier side of eating.

Have a wonderful weekend!

Kathleen


****Do you have a favorite summer salad you would like to share with us? 
Thanks so much for stopping by The Lavender Bouquet. See you on Monday!


Wednesday, May 28, 2014

CREATING A NATURESCAPE MANTEL & DIY VASE

Since I started blogging nearly a year ago, I have noticed an interesting change in how homeowners discuss how much they are spending on decorating. It used to be we didn't discuss prices, but that has certainly changed. Today, with so many DIYers, vintage thrift shoppers, and stores like IKEA, we all feel proud what we have done on so little! I like this new trend.....its fun, rewarding and let's face it, we all love to save money!

On the heels of saving money.......I have been laboring with how to decorate my fireplace mantel for Spring, quite honestly, by not spending a lot of money. I am all about recycling and reusing items by changing up their location.

I tossed around the ideas of colorful twigs, big urns to anchor and loads of other things. Of course I went to Pinterest and perused their pages of ideas, but nothing hit me. Then I was in JoAnn Fabric the other day and I found a small print that was very simple. It had ferns, a butterfly and some lettering painted on it. That was all I needed. I bought the print and built the mantel starting with my new little fern print. It reminded me of the woods when I was a kid where the ferns grew wild......hence my mantel theme was born.


I decided to make vases to incorporate into the theme using jars. Since I have already mod-podged and sprayed jars, I needed to try something else. I headed to Dollar Tree and found this cool lime green and white stripe clothesline and decided to wrap each jar with it. The color was great and would blend in nicely with the existing greens I was using.

Materials needed:

  •  Thin clothesline or twine (Dollar Tree) (My 3 jars took one spool of clothesline.)
  •  Elmers or Fabric glue
  •  Glue gun
  •  Old jars of various sizes
Instructions:
  • Unwind clothesline
  • Dab one spot on the very top of the jar edge with hot glue
  • Start applying the clothesline by pushing the end of the clothesline into the hot glue (Make sure it is secure before moving on.)
  • Apply Elmers or Fabric glue around each line pushing together the clothesline tightly so that there is no gap between rows. It is necessary to make sure you have enough glue on each line to keep things secure. The glue dries clear, so no worries about getting spots.
  • At the bottom of the jar as you near the end, dot it with the hot glue just as you did in the beginning.
It's that easy.......aren't they the cutest? 

  NATURESCAPE MANTEL


To complete the mantel I needed something a little larger on both ends to anchor the vignette. I brought out 2 of my Ethan Allen pieces from years ago, filled them with moss from the Dollar Tree and ivory flameless candles that I had in my entertainment stash. I love the way they flicker in the evening light. 

I also needed some flowing fern like vine that I found in JoAnn Fabrics to ground the picture.


At first I wasn't sure I would like all different shades of green on the mantel, so I added just a bit of color by using fresh flowers in the color of purple and white and that was just enough for me.


I'm really happy with the final results. It's quite simple and was so inexpensive. Why not look around your house to see what you have, re-purposing is so much fun. I love new perspectives on old objects. Is it time for you to freshen something in your home?

I hope you have enjoyed watching me build my new Naturescape Mantel. Well see you Foodie Friday for some heavenly deliciousness!

Until then--Happy Creating!

Kathleen

***Thanks so much for stopping by The Lavender Bouquet. We'd love to hear from you. Feel free to leave us a comment.


Friday, May 23, 2014

THE BURGER OF ALL BURGERS!

Get your grills ready for the best burger treat you have ever had! These mini cheeseburgers will delight even those with the fussiest palates. Yes, they contain THREE types of cheese and other delicious ingredients...........


MINI BURGERS AND CHEESE


SPECIAL SAUCE


MINI THREE CHEESE BURGERS


Look at how beautiful they are. And remember they are MINI because we have to leave room for dessert!

The recipe was a huge hit at one of our Dinner Club parties. I just had to share the recipe with you, since it's time for many of us to use that grill for the first time since last Fall. What a wonderful smell permeating the party. YUM!

MINI THREE CHEESE BURGERS

  • 2 lbs. ground round
  • 4 Tbsp. minced onion
  • 2 tbsp. Worcestershire sauce
  • 2 tsp. Italian seasonings
  • 1 tsp. salt
  • 1/2 tsp. black pepper
  • 6 oz. Brie chees (roll into 14 tsp. balls)
  • 8 slices cheddar cheese
  • 8 slices Gruyere cheese
Prepare mini burgers and put thumbprint in center. Grill. Add Brie ball, cheddar and Gruyere.

SPECIAL SAUCE


  • 1 cup mayo
  • 2 tbsp. fresh lemon juice
  • 3 cloves smashed garlic
  • 1/8 tsp. salt
  • 1 tsp. paprika
Mix in food processor.

That's it-----you can make the burgers ahead and freeze them. Just add the cheese at
grilling time. The special sauce stays good in the frig just like mayo. DON'T FORGET TO PICK UP YOUR FAVORITE MINI BUNS!

I hope you enjoy these burgers as much as we do. Have a wonderful weekend!

                                                        Kathleen


Wednesday, May 21, 2014

BEAUTIFUL MEMORIAL DAY TABLESCAPE FOR THE COST CONSCIOUS!

Every year all over the U.S. we celebrate Memorial Day on the last Monday in May. Our country is full of celebrations with parades and special services to observe those soldiers that lost their lives for our country. We have the freedoms we do today because of these men and women, and, I for one, am very thankful for their service!

Many of us mark this day with the first picnic of the year. In some areas of the U.S. it is the beginning of warmer weather, in others, it may bring sweltering days when air conditioning is truly a blessing. But wherever we are, an outdoor meal seems in order.

Yesterday, was a beautiful day here in New Jersey. The sun was shining brightly, and the breeze picked up a bit just while I was shooting.  I created a Memorial Day tablescape which started with a foundation of royal blue and white wide stripe decorator fabric. 

The first time I laid eyes on this fabric was from my beloved Carolyne Roehm coffee table book, A Passion for Parties. Carolyne decorated using this for a birthday bash she held for family members. I couldn't get over how beautiful it was. The complementary colors are endless, but red came to mind of course because of this being a patriotic holiday.

Memorial Day Tablescape
I filled the mint julep cups with Queen Ann's Lace and the porcelain urn with white Apple Blossoms.


My source list:

1. Porcelain vase-Hobby Lobby
2. Red rimmed plates, red goblets, and floret on napkin-Dollar Tree
3. Blue luncheon plates-Home Goods
4. Blue/white stripe fabric-Boca Bargoons

**Silverware, mint julep cups, and red linen napkins were already a part of my entertaining staples.

I'd love to hear what you think about this tablescape. Please drop us a comment.

 ENJOY!

                                   Wishing you all a safe and fun Memorial Day!  

                                                           Kathleen


Tuesday, May 20, 2014

DON'T LIKE MAIL CLUTTER---CHECK OUT THIS EASY DIY!

Good Morning Friends!

 I bet you are looking at your calendar thinking it's Tuesday why am I reading a blog from The Lavender Bouquet today. Well, apparently I experienced some technical issues yesterday, some of you received the blogs and some did not.  So here I am trying to recreate simply what should have gone out yesterday!  So sorry for any inconvenience.

What did you do over the weekend? Hubby and I traveled to Philly for lunch. He loves finding restaurants that make the "list" of what's delish and unique.  When we arrived to the address given we were a little baffled, however, our lunch experience was much more than we expected. I plan on sharing  this with you in future blog.

Today's blog is a quick and easy DIY! It all stemmed from a necessity; taking the cluttered mail off the corner of my kitchen island. It's so simple I  thought I would share it with those of you that can't stand clutter like me!

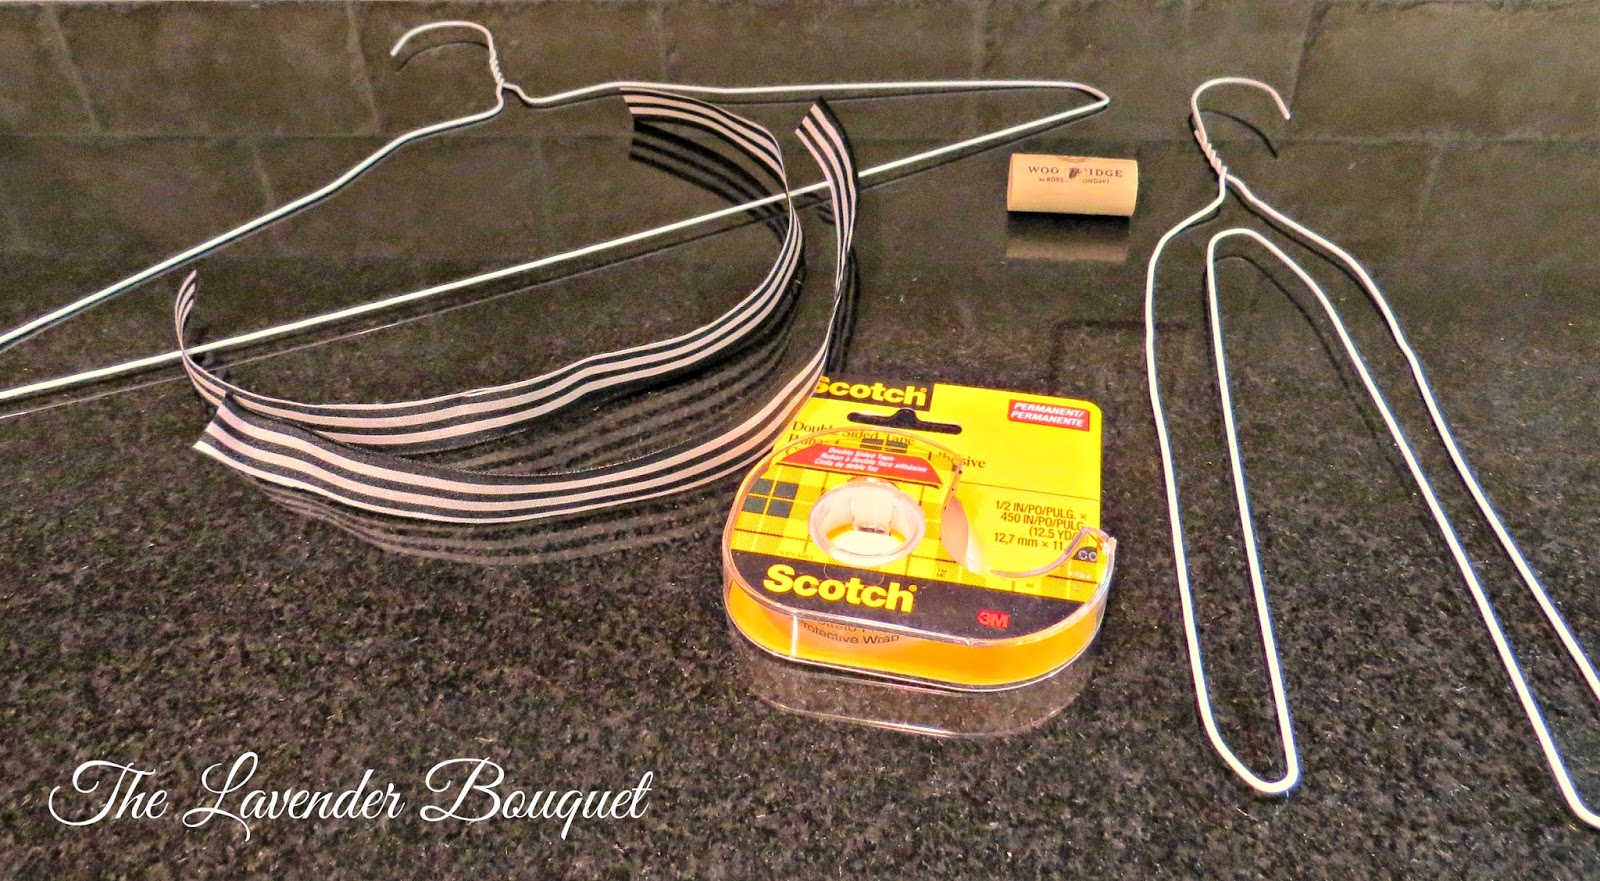
To start the project you will need the following:
  • One wire hanger
  • Fabric or ribbon cut into 16 inch strips 3/4 wide
  • Double sided tape
  • Wine cork


DIRECTIONS:

1. Bend wire hanger into the configuration you see above.
2. Wrap hanger with double sided tape.
3. Wrap hanger with fabric securing tightly as you progress around the wire.
4. Drill hole the size of the neck of the wire in the wine cork, label, and slide over the neck of the hanger.

That's it. Now you have to decide where to hang yours!

***** If you have frayed edges--you may use "fray check." to keep them under control.

I chose to hang my mail holder by our key rings. This way we grab and go......to the post office!


 DIY  MAIL HOLDER

                        See how easy that is?  Now you too, can be clutter free! Have fun!

                                                                  Kathleen

****See you tomorrow with ideas for the upcoming Memorial weekend!


Friday, May 16, 2014

The Lavender Bouquet Foodie Friday RECIPE BONUS----BEAUTIFUL AND DELICIOUS PATRIOTIC DESSERT!

Just me popping back to add a little bonus to your FOODIE FRIDAY experience---

I love to share recipes that have become my family's favorites. BERRY TRIFLE  is one of them. It's a great dessert for the upcoming Memorial Day/4th of July picnics. It's easy, delicious, and makes such a beautiful presentation on your table. It would also make a great quick centerpiece.......here is the link. ENJOY!

http://www.foodnetwork.com/recipes/tyler-florence/berry-trifle-recipe.print.html#


BERRY TRIFLE 


                                                             Have a delicious weekend!

                                                                                                  Kathleen

P.S. My family LOVES this!!

MY SUPER KALE CABBAGE SALAD--COSTCO KNOCKOFF!

A couple months ago my friend in Florida invited me to her house for dinner. She made a delicious Brazilian fish dish and served a great salad with it. When I asked her for the salad recipe she smiled, and said. " it's from Costco and she showed me the bag.  It's called SuperFood....Sweet Kale Vegetable Salad. This salad was amazing and it comes pre-packaged with all ingredients included. The kit includes shredded broccoli, brussel sprouts, cabbage, kale, chicory, dried cranberries, roasted pumpkin seeds and poppyseed dressing.
.
Since the Costco close to me in NJ is not quite ready to open, I decided to pack the salad in my suitcase and bring it back to NJ with me. It was then I realized how silly that was....so I made my own recipe that's pretty close to theirs.

SUPER KALE CABBAGE SALAD


  1. Cabbage Slaw, (I buy Rainbow Slaw with Broccoli, Cauliflower, Carrots and Red Cabbage in it)
  2. 1- bunch Kale  (I used Lacinato--cut into  fine ribbons)
  3. 3 oz.  dried cranberries (or Cherries)
  4. 1/2 cup sliced almonds
  5. Poppy Seed Dressing. (I use Maple Grove Farms of Vermont, Fat Free, Poppyseed Dressing)
Rinse the slaw and the kale, and spin the water out with a salad spinner.  Add the kale, cranberries, almonds, and poppyseed dressing.  One tablespoon of dressing is 35 calories. Add between 6-8 tablespoons of dressing depending on your taste, stir well, and refrigerate.


This salad tastes better as it marinates. Make it in the morning, serve it in the evening or even better the next day!  Stir well each time.  It is packed full of super ingredients and very low in calories.

This salad would be great  to bring to a Memorial Day picnic. Give it a try........it's tested and approved by the hubby too!


                                      Wishing you a SUPER day and a wonderful weekend!

                                                                     Kathleen


**Don't forget to share your thoughts after you make it. It will be interesting to see if you love it as much as I do.

Wednesday, May 14, 2014

WELCOME TO OUR HOME--THE LAVENDER BOUQUET SPRING 2014 OUTDOOR TOUR

Good Morning Wednesday my friends!

I am so pleased and humbled that The Lavender Bouquet is being shared and viewed by so many new friends!! WELCOME TO ALL OF YOU, and THANK YOU to the many friends that have been with me since The Lavender Bouquet became more than a dream in June 2013!

Don't forget to sign up to have the blog delivered directly to your inbox. Just add your email address in the box on the right hand side of this page. Many of you have already found "The Lavender Bouquet Facebook" page also. I typically add other articles and share things there that may not appear on my  tri-weekly blog. This is a public page so if you aren't a Facebooker, no problem, just Google The Lavender Bouquet Facebook!

I am feeling pretty accomplished this morning. Over the weekend the hubby and I worked outside getting things in shape for Spring. Then on Monday, I finished up all of the loose ends, getting the pots planted and plants in the ground. I even had enough energy to clean my house from top to bottom yesterday. Looking back, I have no idea where that energy came from. I fell into bed last night and didn't remember anything until I woke up at 6:00 a.m. this morning! 
Sharing the fruits of our labor with you........

I love our yard in the Spring. It has taken nearly 3 years to get it to this point. The neighbors told us it used to be quite a sea of dandelions and now it's lush and beautiful. Thank you Tru-Green!


When we bought the house there were no landscaping beds in the backyard at all. Hubby, poor guy, carved three new beds for me so that we could add a bit of color to the otherwise green scape. In all fairness to the previous owners, our deer problem makes it quite difficult to plant anything and have it last! Everyone in our area, uses the RUTGERS Landscape guide as their bible......hence why I made the choices that I did for plants. Time will tell if they are correct!

In the first bed I planted Janie Deep Orange Marigolds, Black Knight and Royal Red Butterfly bushes, and a plume grass, Miscanthus sinesis Silberfeder. It will have these striking flower plumes of copper and then turns a beautiful silver color. It grows 6-8 feet so it, along with the butterfly bushes will fill the bed in nicely.

The center photo is the Boston ferns that just thrive on our patio. They will at least triple in size by the end of summer.

In the third photo is the other new garden that hubby made for me. We have two HUGE beautiful evergreens that provide us afternoon shade and privacy. By adding the garden in the forefront we will now have a bit of purple from the Midnight Salvia (perennial) and yellow from the Janie Primrose Marigolds. I tried these plants last year in the front of the house and the bunnies and deer left them alone.


I was trying to explain to my mother what color flowers I was using on the patio this year. The first thing that came to mind was, Mexican Fiesta! Because I have black and white stripe patio throw pillows for my chairs, I wanted to open up the colors to a more vibrant palette. Last year I had the deep purples, pinks and yellows. I wanted to try something new and I really wanted a certain color red to be the primary.

I headed to my favorite neighborhood landscape store, Kales, and sure enough RED MADNESS Petunias jumped out at me. They are very large blooms and grow a bit taller than
I have had before, so it should get a nice pop of red.  Continuing on with my bright new palette, I added Blue Superbells (which are really deep purple), Coconut (white) Sunsatia, and Janie Deep Orange Marigolds. In some pots I changed up the lime color this year by adding Creeping Jenny instead of my tried and true Sweet Potato vine that I had used for years. In the planter near the new garden I used Coleus and more Red Madness.

                   MY MEXICAN FIESTA COLLECTION


Last, but not least..........the BLUE bench vignette.  Last year hubby installed this beautiful arbor for me and this year it just got better. He added hooks for me to hang my Boston ferns on each side. I added colorful pansies to the Boxwood planters. Of course the addition of the transformed blue bench cannot be complete without a cute little Pink Boot Planter. 

A little history on the planter........hubby and I were at Cracker Barrel having breakfast and of course I had to peruse the gift shop. I found these plastic formed  planter boots.  I had to have them, AND I had  to buy my MOM some too! I wasn't keen on the Army green that they were painted, no offense to our soldiers in the Army, so keeping my blue bench in mind, PINK came to mind. I know you are surprised! 

I spray painted them in a Valspar Bubble Gum Gloss.  I love them!! I am a sucker for whimsy things like this. Just a touch goes a long way in my book. In the meantime, my Mom got her Mother's Day package, loved it and called me to tell me she was painting hers pink!!! Genetics! 


Well, that about wraps up what's been going on at my house. Whew, a lot of work but so satisfying. As every year passes, I feel our house is transforming to be what I envisioned when we bought it. 

I hope that I have inspired your creative side, and would love to hear about some of your Spring ideas that bring your home to life!

Don't forget to stop back on Foodie Friday for another delish dish....another easy dish that would be great for a picnic OR a nice addition to your dinner menu!


                                                                Kathleen  


Monday, May 12, 2014

IT'S TIME FOR THE PORCH RENOVATION!

Wow----Welcome to all of our new friends! We sure are growing, and I am so thankful to share my days with all of you. I hope you all had a great weekend. Ours was busy, but fun. 

We've got an upcoming renovation project that I've been working on, and in prepping my selections list for the carpenters, I thought maybe it would be helpful to share a bit of our history with you.

When we closed on our home 2 1/2 years ago, we had already chosen our contractors and completed all of the selections for both inside and outside. As soon as the ink was dry from our closing........the very next morning the house was a buzz with workers. Our neighbors will attest to the driveway full of trucks. I am sure they wondered, "What and who do we have moving in here!"  No worries.......we now have a bunch of new friends!


  • Landscapers
  • Carpenters
  • Gutter Company
  • Roofers
  • Pressure Washers
  • Electricians
  • Plumbers
  • Granite/Tile Companies
  • Appliances
  • Wood Floors
  • Wood and Marble Floor Restoration
  • Carpet Cleaners (Basement and Upstairs Bedrooms)
  • Paint/Wallpaper Company
  • Security Company


You get the idea........it was a flurry of activity that lasted for nearly two months.  This was a real test to my abilities as a General Contractor. With 13 moves under my belt, from new construction to this latest renovation being my largest renovation undertaking........you could say I have learned a lot. But, I am not naive enough to think there will not be those unforeseen things that happen along the way. Like, the wood floor that arrived originally was not of the quality we expected so a change in vendor meant that we moved into the house without the wood floor being completed. No big deal. We LOVE plywood sub-floor with carpenter graffiti sprinkled on it!


So the biggest renovations are completed inside, but as usual with any home, there's always a project. For us, it's now time for a Front Porch renovation....unfortunately it is made of wood that has begun to rot in spots.  I  came up with a plan, have done my research, and have interviewed carpenters.


My idea is to change the design by removing all but 2 pillars, (we are hoping this is all we need to bear the load)  which will be at the forefront on each end of the porch.  Since we didn't build the house from scratch, I still like to put our personal stamp on whatever we can. I like to change things up a bit if possible.

The new pillars will be larger in diameter and won't be tapered. The tops of each will have a decorative cap on them. We have already had to replace the roof so the roof will remain flat.

Below are some of the materials I have been advised are all good products so that we don't have to worry about rotting wood ever again!


With selections completed, now we wait for our estimates to come in. We always start out with what the hubby affectionately calls, "NICE TO HAVE" choices to be priced out. Hence, the beautiful caps I have chosen!  However, cost prevails always, and I promised I would stay within the budget. We'll see where these final numbers come in. But hey, that's life......I'm just excited my hubby said, "Get it done!"

Hope you enjoyed this part of our journey of our home renovations. I LOVE this stuff!

Wishing you a creative day!


 Kathleen

****Are you doing any renovating right now? What project are you up to your elbows in?
Share with us!


Friday, May 9, 2014

MADE FOR MY MOM!

It's that time of year when Mothers everywhere are celebrated. I decided to make a placesetting just for my Mom today. She loves plums and purples, and I imagined if I could be with her, that her place at my table would resemble something like this.......


 So for my Mom, all of the Mom's out there taking a moment to read this, and for those in our Heaven above.......I wish you a wonderful Mother's Day filled with LOVE!

                                                                       Kathleen xo
                                               

THE HEALTHY SIDE OF PICNIC FOOD!

I was looking ahead on the calendar, and realized Memorial Day Weekend will be here before we know it. We love having a good ole fashioned BBQ that day. In the North it was always our signal that warmer days were ahead. And if we were lucky, Memorial Day would be one of them!

I have been searching for new  picnic food ideas. There are staple dishes that we still see at some picnics; one of them is Baked Beans. Some of the recipes are full of all kinds of sweetness, molasses, brown sugar and even a little added fat in the form of bacon. But those aren't the ones I am looking for. I want something that the prime ingredient is beans, but is made healthier, and tastes great......so even the kids will like it.

Today I am featuring my substitute for Old Fashioned Baked Beans;  it's called Carrot, Dill & White Bean Salad. Sounds different right? I guarantee you will be amazed at its flavors. 


First up, make this marinade of olive oil, shallots, and lemon juice.


Brown the carrots till they are deeply brown. Then add the beans to the pan and finish cooking.  Follow directions to finish on recipe. Link below--


This salad is so easy and the taste is light and a bit sweet. The dill, lemon, and shallots add a nice touch really bringing in a fresh new flavor. You may serve the dish warm or room temperature, which is so nice for a picnic. Sprinkled toasted almonds are used in the recipe at the end, but we like it just the way you see it in the photo.

Here's the delish recipe:
http://www.101cookbooks.com/archives/carrot-dill-white-bean-salad-recipe.html


Well, it's not your Mama's Baked Beans, but it is chocked full of nutrients, and not overly sweet. I love how they worked in those beautiful orange carrots into the mix.

Give it a try for your next picnic when you are asked to bring a dish to pass. Trust me, they will all be asking you for your recipe! 

Keep watching Foodie Friday for the month of May for more of these substitute dishes that are tasty but healthy!

                                              Wishing you a wonderful weekend,

                                                                 Kathleen

********See you on Monday.


Wednesday, May 7, 2014

RESTORING THE LIFE BACK INTO A GREAT OLD GARDEN BENCH!

I love the Spring, but no matter how we try to keep our projects to a minimum, it never seems to work out that way.  Many moons ago we bought a wooden bench that has always been a part of our flower gardens. Every couple of years my hubby has painted it a nice crisp black.

This year hubby is out of town, and since I wanted to check this project off the list, I decided to paint it myself. I wanted a glossy Royal Blue to give it a nice change. My husband likes Royal Blue too, so we were in agreement. He suggested that I use spray paint. I selected a Valspar Paint & Primer Premium Finish Glossy #85205 Classic Royal Blue.

This is a photo of the aged wooden bench that clearly still has some good life left in it, but needed a fresh coat of paint.


I woke up this morning, and it was sunny and not too windy! So that was my cue to get the painting done. The photo below is AFTER 3.5 cans of paint and a few hours of drying. I love that Royal Blue! I can't wait until hubby gets home to check out my work!


Well, I can cross the bench  painting off my list. Now...... planning two new small flower gardens, and allot of research on new plant combinations for my pots on the porch and patios. Guess I know what I am doing tonight!

  What are you working on? Do you have any plants that you are
particularly fond of that you use in your pots? I would love to hear your suggestions!

Until then, Happy planning and planting!


Kathleen

****Thanks for visiting The Lavender Bouquet today. Stop back on Foodie Friday for a great side dish idea!

Monday, May 5, 2014

RALPH LAUREN INSPIRED SUMMER AND SHERBET

Hello everyone. Are you a newbie to The Lavender Bouquet? If so, Welcome....if not..so glad you are all back! 

A few weeks ago on one of my Florida trips I mentioned to you that I went to my favorite fabric store, Boca Bargoons. I walked away with some beautiful designer fabrics and lots of ideas on how to use them.

The fabric I am using today is Ralph Lauren's Porcelain Stripe. At first glance, I thought Summer and Sherbet when I saw it.  (No it wasn't because I hadn't had lunch before I shopped.) I thought how fun it would  be to have an Ice Cream Social using these beautiful colors..... bright orange and pink!

I do have this thing for PINK lately, and when I was in the grocery store I spotted these vintage Jardin jars in the floral department. They aren't food safe, however, they make great vases and candle holders. Hence today's centerpiece. Simply vintage....with my new Sherbet Stripe fabric.


I found these great luncheon plates in Homegoods that begged me to bring them home. I thought of my fabric as soon as I saw them. Don't you just love the addition of yellow to the mix?


Try using these colors for your parties or maybe just a lunch with the girls. They are sure to make your guests smile.


Have a beautiful day!

Kathleen

***Thanks for sharing your day with me. Don't forget to stop in on Wednesday for a little DIY fun!  Also, remember THE LAVENDER BOUQUET is on Facebook too! 


Friday, May 2, 2014

A CINCO DE MAYO CELEBRATION FOR TWO!

Every year on the 5th of May the celebration of Cinco de Mayo is observed to commemorate the Mexican army's victory over the French forces. It was when we lived in Houston that we grew to appreciate the Mexican heritage and the food that would forever change us!

Well, we aren't in Houston anymore, but not a year goes by that we don't take the time to celebrate whether it be a quiet evening at our favorite Mexican restaurant or a full fledged party for the neighborhood.

This year it's just a small  party for the two of us......


These little porcelain Mexican dolls were a gift from my Uncle/Godfather who sent me these while he was in the Army at least 55 years ago. I love their handpainted faces and beautifully handsewn clothes. 


These little bites are so easy. I browned ground beef and added a packet of Taco Seasoning. Then stuffed mini Fillo shells with the taco meat and sprinkled each top with Mexican blend cheese. Pop in the microwave for 2 minutes and serve.


I stopped by the grocery store and bought their homemade guac and salsa. This saved me so much time in preparation and having too many leftovers.


No Cinco de Mayo party is complete without a good Margarita. Since my recipe makes servings for 25 we are settling for the next best....Jose Cuervo!


  Wishing you a safe and delicious Cinco de Mayo!

Kathleen

***Please don't forget to LIKE our Facebook page!! And tell your friends about us!